
The Mainstays Side Storage Desk is a versatile, space-saving solution ideal for home offices, dorm rooms, or study areas. It offers ample storage and a sturdy design, requiring assembly for setup. Perfect for students or professionals seeking an affordable, functional workspace.
1.1 Overview of the Product
The Mainstays Side Storage Desk is a practical, compact workspace designed for efficiency. Featuring built-in storage solutions, it’s ideal for small spaces like dorm rooms or home offices. Made from durable materials, it offers a sleek design and functional features such as shelves and drawers for organization. Assembly is required, but clear instructions are provided for a smooth setup process.
1.2 Importance of Proper Assembly
Proper assembly is crucial for ensuring the desk’s stability, safety, and functionality. Incorrect assembly can lead to a wobbly or unstable structure, potentially causing damage or injury. Following the provided instructions carefully guarantees a secure and durable workspace, maximizing the product’s lifespan and performance. This step is essential for enjoying the desk’s full benefits and reliability.
Assembly Instructions Overview
The Mainstays Side Storage Desk assembly involves a structured, step-by-step process outlined in the PDF manual. Follow the instructions carefully to ensure proper construction and functionality.
2.1 Step-by-Step Assembly Guide
The step-by-step assembly guide provides a clear, systematic approach to constructing the Mainstays Side Storage Desk. Begin by unpacking and organizing all components. Start with the desk frame, attaching legs and supports. Next, assemble the storage compartment and shelves, ensuring proper alignment. Follow the sequence in the manual to avoid errors. Use the provided hardware and tools to secure parts tightly. Double-check each step for accuracy before moving forward.
2.2 Aligning and Securing Parts

Aligning and securing parts correctly is crucial for the stability of the Mainstays Side Storage Desk. Ensure all components fit snugly before tightening screws. Use the Allen wrench to secure bolts firmly, avoiding over-tightening. Double-check alignment using the provided diagrams to prevent misassembly. Properly aligned parts ensure a sturdy and even surface, essential for the desk’s functionality and longevity.
2.3 Attaching Shelves and Storage Compartment
Attach shelves and the storage compartment by aligning their pre-drilled holes with the desk frame. Secure them using the provided screws, tightening firmly but avoiding over-tightening. Ensure the storage compartment fits snugly and operates smoothly. Properly installed shelves and compartments enhance the desk’s functionality, providing ample space for organizing office supplies and personal items efficiently.
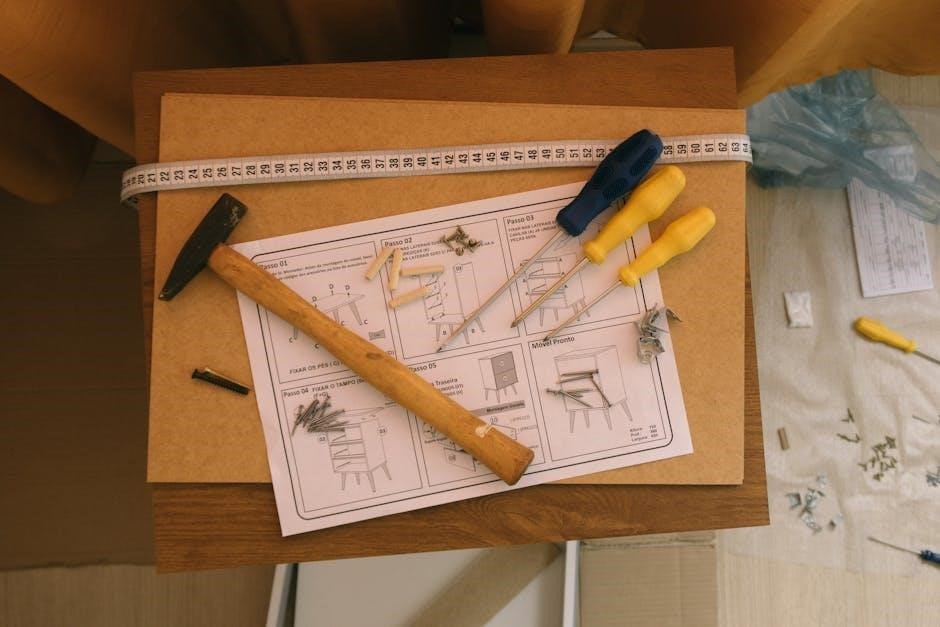
Tools and Materials Required
Essential tools include a screwdriver, Allen wrench, and hammer. Materials like screws, dowels, and cam locks are provided. Gather all items before starting assembly.
3.1 List of Necessary Tools
The following tools are essential for assembling the Mainstays Side Storage Desk:
- Screwdriver (Phillips and flathead)
- Allen wrench (for bolts)
- Hammer (for tapping parts into place)
- Clamps (to hold pieces steady)
- Measuring tape (for alignment)
- Safety glasses (for protection)
These tools ensure a smooth and safe assembly process.
3.2 Additional Materials for Stability
For enhanced stability, consider using:
- Clamps to secure parts during assembly
- A level to ensure the desk is even
- Anti-slip pads for the legs
- Wood shims for uneven surfaces
These materials, while not provided, can enhance the desk’s stability and prevent wobbling. Ensure all connections are tightened properly for long-term durability.

Safety Precautions
The Mainstays Side Storage Desk assembly requires adult supervision. Use protective gear, ensure a clear workspace, and handle sharp edges and heavy parts with caution. Follow the manual to avoid accidents.
4.1 General Safety Tips
Ensure a clear workspace to avoid tripping hazards. Wear protective gloves and eyewear when handling sharp edges or heavy parts. Use tools correctly to prevent injuries. Keep children away during assembly.Avoid overreaching and take regular breaks to maintain focus. Always follow the instructions provided in the manual for safe assembly.
4.2 Handling Sharp Objects and Heavy Parts
Always wear protective gloves when handling sharp edges or metal components to prevent cuts. Lift heavy parts with care, bending at the knees to avoid strain. Ensure a firm grip on tools to prevent slipping. Avoid stacking heavy items unsafely, and consider having a second person assist with large or cumbersome sections of the desk.
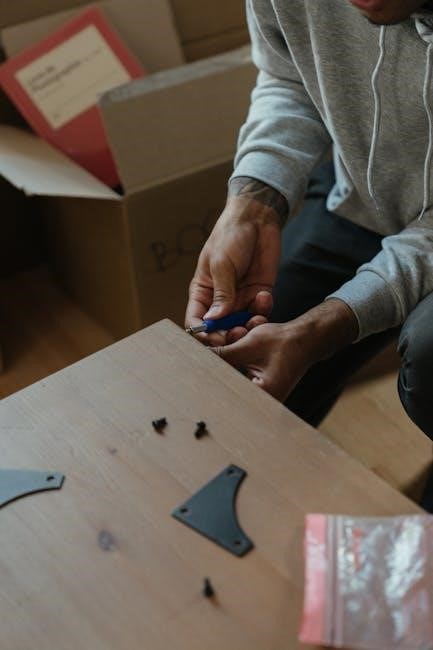
Identifying and Organizing Parts
Begin by matching each component with the assembly manual’s inventory list. Sort hardware like screws and bolts into labeled containers. Use a checklist to ensure no parts are missing, and organize them by size and type for easy access during assembly.
5.1 Matching Parts with Assembly Manual
Start by carefully comparing each part with the components listed in the assembly manual. Use the diagrams provided to identify hardware like screws, brackets, and shelves. Ensure all items are accounted for by checking them off the inventory list. Pay attention to labels or markings on parts to confirm they match the manual’s descriptions. This step is crucial for ensuring accuracy during assembly and preventing errors.
5.2 Labeling and Sorting Hardware
Organize hardware by type and size to streamline assembly. Use small containers or bags to separate screws, nuts, and bolts. Label each container clearly to avoid confusion. Cross-reference the manual’s parts list to ensure all items are accounted for. Sorting hardware beforehand saves time and reduces frustration during the assembly process. This step ensures everything is easily accessible when needed.

Common Mistakes to Avoid
Common mistakes include rushing through steps, not following the manual, misaligning parts, over-tightening screws, and not organizing hardware. These errors can delay assembly and lead to a shaky structure.
6.1 Incorrect Alignment of Components
Incorrect alignment of parts can lead to instability or improper fit. For example, misaligning the Drawer Side-Left (T9107213130EV) can prevent drawers from fitting correctly. Always ensure edges and holes align precisely before securing with screws. Refer to the manual’s diagrams for accurate placement, and double-check each connection to avoid structural issues during assembly.
6.2 Over-Tightening or Under-Tightening Screws
Over-tightening screws can damage the desk’s surface or strip screw holes, weakening its structure. Conversely, under-tightening may result in a wobbly or unstable desk. Always tighten screws firmly but avoid excessive force. Use the correct screwdriver size to prevent cam-out and ensure all connections are secure without over-stressing the material. This balance is crucial for durability and stability.
Tips for Smoother Assembly
To ensure a smooth assembly, work in a spacious area, follow the manual step-by-step, and use the correct tools. Organize parts beforehand to save time.
7.1 Working in a Spacious Area
Working in a spacious area is essential for efficient assembly. A clutter-free environment prevents losing parts and allows easy access to tools and materials. Clearing a large workspace ensures safety and reduces assembly time. A well-organized setup helps follow instructions smoothly and minimizes errors.
7.2 Following the Assembly Sequence
Adhering to the assembly sequence is crucial for a successful setup. Each step builds on the previous one, ensuring stability and proper alignment. Start with the base, proceed to the desktop, and finish with storage compartments. Always reference the manual for the correct order to avoid mistakes and ensure all parts fit seamlessly together.
Final Touches and Inspection
After assembly, ensure the desk is stable and level. Double-check all connections, tighten any loose screws, and verify that shelves and drawers function smoothly for optimal use.
8.1 Ensuring Stability and Leveling
Ensure the desk is stable by placing it on a firm, even surface. Use a carpenter’s level to confirm the desktop is perfectly horizontal. Adjust the legs if necessary to achieve balance. Double-check all hardware connections to prevent wobbling. Proper leveling ensures the desk remains sturdy and functional, avoiding potential damage or safety hazards during use.
8.2 Double-Checking All Connections
After assembly, inspect all screws, bolts, and joints to ensure they are securely tightened. Verify that shelves and compartments are properly aligned and attached. Review the assembly manual to confirm no steps were missed. Double-checking connections ensures structural integrity, prevents wobbling, and guarantees the desk’s stability and longevity for safe and reliable use over time.
Troubleshooting Common Issues
Common issues include wobbling, misaligned shelves, or loose connections. Check for tightness of screws, ensure parts are properly aligned, and refer to the manual for solutions.
9.1 Wobbly or Unstable Desk
A wobbly desk often results from loose screws, uneven surfaces, or improper assembly. Check all connections, ensure screws are tightly secured, and verify the desk is on a level surface. If instability persists, refer to the manual for guidance or consider using shims to stabilize the legs. Proper alignment of parts like the Drawer Side-Left (T9107213130EV) is crucial for stability.
9.2 Misaligned Drawers or Shelves
Misaligned drawers or shelves can hinder the desk’s functionality. Ensure all hardware is correctly attached and that the Drawer Side-Left part is properly fitted. Double-check the alignment during assembly, as per the PDF manual. If issues arise, adjust the positioning of brackets or guides. Tightening screws evenly can also resolve minor misalignments, ensuring smooth operation of the storage compartments.
User Reviews and Feedback
Users praise the Mainstays Side Storage Desk for its affordability and functionality, ideal for students and small spaces. Many find assembly straightforward, though some note wobbling if not properly secured.
10.1 Positive Aspects of the Desk
The Mainstays Side Storage Desk is praised for its affordability, functional design, and space-saving features. Users appreciate its sturdy construction, ample storage options, and easy assembly process. It’s ideal for small spaces like dorm rooms or home offices, offering great value for its price. The desk’s compact size and practical storage solutions make it a popular choice for students and professionals alike.
10.2 Common Complaints and Solutions
Some users report issues with wobbly desks if not assembled properly. Ensuring all screws are tightened evenly and the desk is placed on a level surface can resolve this. Others mention drawer alignment problems, which can be fixed by carefully following the assembly instructions and double-checking the hardware placement. Overall, the desk remains a popular choice with manageable assembly challenges.

Additional Resources
Download the PDF manual from the official website or retailer. Additional guides, tutorials, and videos are available online to assist with assembly and troubleshooting.
11.1 Downloading the PDF Manual
The Mainstays Side Storage Desk Assembly Instructions PDF is readily available for download on the official product page or retailer websites. Ensure you download the correct version corresponding to your desk model. The manual provides detailed, step-by-step instructions, diagrams, and safety guidelines to help you assemble the desk efficiently. It’s a valuable resource for troubleshooting and understanding each component.
Online tutorials and videos are excellent resources for assembling the Mainstays Side Storage Desk. Platforms like YouTube and official retailer websites offer step-by-step visual guides. These videos cover everything from unboxing to final adjustments, making the assembly process clearer for visual learners. They are particularly helpful for understanding complex steps and ensuring all parts are correctly aligned and secured.
11.2 Online Tutorials and Videos
Online tutorials and videos provide visual guidance for assembling the Mainstays Side Storage Desk. Platforms like YouTube offer step-by-step instructions, while official manuals like the Dorel Home 8104885WC Mainstays Side Storage Student Desk Assembly Manual are available as PDF downloads. These resources help users understand complex steps and ensure correct alignment and securing of parts, making assembly more accessible for visual learners.
12.1 Summary of Key Points
The Mainstays Side Storage Desk is a practical, space-saving solution for home offices or study areas. Its assembly requires careful attention to the provided PDF manual and online resources. Proper alignment, securing parts, and following safety guidelines ensure stability. Additional tools and materials may enhance stability. User reviews highlight its functionality, though some note challenges in assembly. Overall, it’s a cost-effective option for efficient workspace organization.
12.2 Final Thoughts on Assembly Process
Assembling the Mainstays Side Storage Desk is achievable with patience and organization. Following the PDF manual closely ensures a smooth process. While some users find it time-consuming, the end result is a functional and stylish workspace. Proper preparation and attention to detail are key for a successful assembly experience.
Frequently Asked Questions (FAQs)
Common questions include assembly time, required tools, and stability tips. Ensure all parts are labeled and follow the PDF manual for a smooth process.
13.1 Time Required for Assembly
The assembly typically takes 1-2 hours, depending on your skill level. Having two people can speed up the process. Ensure all parts are organized beforehand to save time. Double-checking instructions and hardware can prevent delays. Plan for a few extra minutes to verify stability and alignment post-assembly.
13.2 Recommended Number of Assemblers
Assembly is typically easier with two people, as some parts may require additional hands for alignment and stability. While one person can manage, having a second pair of hands ensures a smoother process and reduces the risk of errors. This collaboration can also speed up the assembly time significantly.